Showing posts with label layout ideas. Show all posts

Tuesday, November 17, 2015

December Stories with Bo Bunny Dear Santa

The holiday season is fast approaching and I've been busy crafting with the  Dear Santa Collection by Bo Bunny at FotoBella.com.  Let's be honest, the holidays are always arrive, before we are ready and are over in a blink of an eye.  This layout I'm sharing today is one I had to play "catch up" with from a Christmas past.  

Dear Santa is a bright and colorful collection that partners perfectly with some Christmas photos of mine from 2009.  I had started a layout with these photos awhile ago but the layout needed it's second page before going in the album.   


Papers used from the collection:  Dear Santa, Wonderland, and Festive.
Photos Sizes used:  (2) 4x6 and (4) wallets.


I created the large shape using my Creative Memories Large Bracket from their cutting system.  The same thing can be done with your Silhouette, Cricut, Super 8 punches, etc.  Use your favorite shape and matte with a solid color cardstock to make it pop!  If you want to get a lot of photos on one page, creating a collage, like I did here, is a great way to do so.  


I kept the embellishments simple for this layout, since they are a lot of patterns in the paper.  The star border along the bottom is from the layered chipboard pack as well as the "December Stories" banner at the top of the collage.  

Preserve your memories of Christmas past or present with the fun BoBunny Dear Santa I Want It All Bundle from FotoBella!  You will love this collection as much as I do!

Have a fabulous day!


Saturday, November 14, 2015

Dear Santa Double layout with Bo Bunny


The Christmas season is fast approaching and it's time to get busy making Holiday crafts!  What better way than with Bo Bunny's Dear Santa I Want it All Bundle from FotoBella.com.  Are you ready for all this holiday cheer?  It's Apryl, FotoBella Design Team member with a cheery holiday double layout to share with all of you today.

Paper used to make this layout:  Dear Santa, Advent, Season, Snowfall and Festive.

There's a couple things I fell in love with right away in this collection.  One was the bright colored striped paper and the second was all the fun squares.  I hand cut out all the squares, inked the edges and used a couple for journaling.  


This came out such a fun and bright layout.  Perfect for holiday photos. 


Visit FotoBella.com to get this fun I Want It all Bundle for yourself!  

Have a fabulous day!


Friday, May 15, 2015

Dream Come True Layout with Simple Stories Enchanted

Why hello there and welcome to the Simple Stories Enchanted collection and Fancy Nancy layouts.  My daughter and I had the pleasure of attending a book signing event for Jane O'Conner, author of Fancy Nancy books and I have a ton of photos to share.  The Simple Stories Enchanted collection, found at FotoBella.com was just the theme I needed to scrap these photos of Jane O' Conner's tour bus.  


The background page is a beautiful gray and white chevron with a floral pattern.  I matted all three photos vertically on white cardstock before placing them on the page.  I used the floral border sticker from the 12x12 sticker sheet to go along the left side edge of the photos.    Due to the background paper having a busy pattern, I wanted to keep the embellishments simple.  


An element I haven't used a lot of in the past is photo overlays.  Typically because they usually aren't the right size for the photos I'm using.  The "Dream Come True" overlay fit over the photo at the bottom without covering up too much of anything captured in the photo.  I added the "love this" phrase sticker for an added touch.  


I like to get creative with my journaling, and in this layout.  I wrote along the left hand side edge of the cardstock matte of the photos.  I think it turned out really nice.  

If you haven't seen the Simple Stories Enchanted Collection in it's entirety, visit FotoBella.com.  You'll love everything about this collection!  I know I do!

Have a fabulous day!


Saturday, June 1, 2013

Imaginisce June Challenge

Happy June!  Hellooooo Summer!

.....and with that we have another sketch challenge with Imaginisce!


Here are the Challenge Rules:
Create a project using the sketch as inspiration and ....
1.  Theme: Father(s)
2. Use the color BROWN
3.  Use some kind of recycled product on your project

Visit Imaginisceblog.com to upload your take on this sketch and a chance to win a fabulous prize!

Here is the layout I created using the sketch:


I used a combination of Childhood Memories & Outdoor Adventure Collections from Imaginisce.  For the recycled item, I took a piece of bubble wrap and painted it with a white chalk pen.  

Have your own fun with this sketch and enter it for a chance to win at Imaginisceblog.com

Have a fabulous day!


Wednesday, May 1, 2013

Imaginisce's May Sketch Challenge

May?!? Seriously.... oh my.  Well the good news is another month brings another fun sketch challenge with Imaginisce :)


Create a project using the sketch provided and follow these challenge rules:

1.  THEME: Mother. 
2. Use the color YELLOW in your project.  
3.  Use a CHEVRON design on your project. 


A few detail shots


Supplies:  Imaginisce Childhood Memories, Imaginisce Animal Crackers Collection, I-rock, hot rocks, Sunset Sizzix font, glossy accents, Heidi Swapp Color Shine.

Visit imaginisceblog.com for all the details on entering the challenge and to see more inspiration!

Have a fabulous day!


Tuesday, February 12, 2013

"My Two Loves" Layout

Today I am sharing the Love You More Collection by Imaginisce.  This collection is beautiful!  Perfect for those "Love" themed projects.  I chose two of my favorite photos of my kids to design this layout around.  I love how it came together.


I really like mixing and matching patterns as you can see in this layout.  Chevrons, hexagons, hearts, polka dots make for a stunning combination (I think ;).   What I like most about this layout is the cutout heart I used to frame my son's photo.


To embellish the page I matted the Love You More sticker sentiment and added a button and twine.


               I also added dimension to my title by adhering the sticker letters using pop dots.  

Wishing you all a Happy Valentine's Day!


Wednesday, January 23, 2013

Childhood Memories by Imaginisce

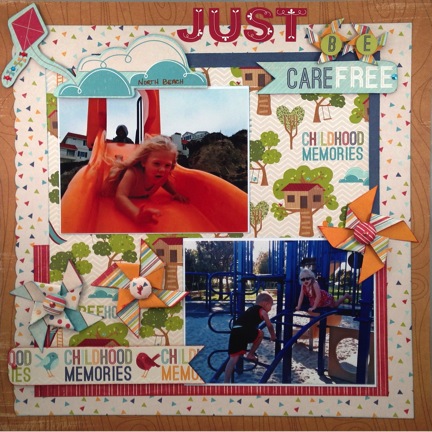
Hello, so glad you could join me today to celebrate the release of Imaginisce's new collection, Childhood Memories!  Hooray!!!  This was one of the first collections I was lucky enough to work with for my first Design Team project.  I love this collection!  It's full of vibrant, fun colors that go perfectly with those pictures of active little children playing to their hearts content.  

I created this 12x12 layout using photos of my kids playing at the park.  I was inspired by this collection to capture those carefree moments that kids so easily embrace.  I thought the kite, clouds and making the pinwheels were the perfect embellishments to accompany these photos!  


The pinwheels are a very fun addition to this page.  The centers were made using the I-top tool and brads.  And the bling was added using the I-rock rhinestone setter.  Both tools are made by Imaginisce!


I made a second layout with this collection.  In this layout, I was inspired by the bouncy balls in the bounce house photos I used, to create numerous circle embellishments throughout the layout.  I further embellished the circles by create pennants out of the stickers "Giggles", "Play", and "Care Free". 


And because I am lovin' that I-rock tool, I added some Hot Rocks to the pennants and the circle at the bottom of the page.


I hope that you are as excited about this collection as I am!  It's available now, so add it to your supplies stash and get to scrappin' those fun filled childhood memories photos!


Have a fabulous day!


Thursday, December 27, 2012

Simply Beautiful with Bo Bunny Serenade

I hope everyone had a wonderful Christmas.  Today I am sharing my Design Team project with Fotobella.  This layout was made with the BEAUTIFUL Bo Bunny Serenade-I Want It All Collection found at fotobella.com.


Supplies:


· Paper: Cutouts (Side B), Dragonfly (Side B), Stripe (Side B), Garden (Side B), Poppies

· Combo Sticker Sheet, Brads, Petals

· Xmas Red Stickles

· Gold Stickles

· Pop Dots

· Dark Red Ribbon

· Black Ink
Photo Sizes:
· 5”x7” Portrait

Tools:

· Lucky 8 Classic Wreath Punch (also sold at Fotobella)

· Circle Cutter

· Stapler

· Paper Trimmer

· Paper Piercer


2. Choose the following paper: Cutouts (Side B), Dragonfly (Side B), Stripe (Side B), Garden (Side B), Poppies.
3. Select the Dragonfly Paper and measure and mark it at 9”x9”.


4. Trim the paper down to 9”x9”.

5. Using the Lucky 8 punch Classic Wreath. Set the cut settings to “on” for the Outer Cut and the Inner Cut.
6. With the red side of the paper facing up, begin punching all four corners.


9. Ink the edges of the shape with black ink.
                       
                             
10. Select the Cutouts Paper Side B and your circle cutter tool.
                            
11. Cut out a circle that is 6” in diameter.
           

12. Matte your photo in white cardstock, matte with Poppies paper and then matte a third time with Garden Paper Side B. Place the photo on top of the Circle as shown.
                                 
13. Select a dark red ribbon and gather three loops together. Use a staple to secure the loops at the base (where my thumb is holding the ribbon). Do not cut the ribbon tails.
14. You will want to leave the ribbon long enough to place the Simply Beautiful Sticker on top with two ribbon tails showing on the left of the sticker.

15. Using pop dots, adhere the Simply Beautiful Sticker to the bottom left hand corner of your matted photo.
16. Select a small red and yellow flower, layer and attach with a brad. Using a glue dot, adhere the flower embellishment so that it covers the small red flower to the left of the word “simply” on the sticker.


17. Select the sticker that says “Cherished Memories” from the 12x12 sticker sheet. Using pop dots adhere the sticker to the top right had corner of the matted photo. Select a small black and red flower, layer and secure with a brad.


18. Embellish the layout with Xmas red and gold Stickles.


Hope you enjoy this beautiful layout you just made!

Have a very Happy New Year!